
- 0
- 5,013 words
As an Amazon Associate I earn from qualifying purchases.
This post contains affiliate links.
On the JJ Barnes Blog, discover 17 easy Halloween nail designs using household tools like toothpicks and bobby pins for a salon-quality look without the booking.
Halloween nail art can look like a salon job, but steady artist hands or a drawer full of special tools are completely unnecessary. Cute DIY Halloween nails require only polish, a toothpick, a bobby pin, and a little patience. Standard at-home manicures often end with uneven lines or smudged dots, so these designs provide room to start small and fix mistakes as progress happens.
Beginners, busy parents, students, and anyone wanting festive nails without a salon booking can utilize this guide for short nails, long nails, natural nails, and press-ons. Simple methods like dotting, tiny lines, color blocks, and basic shapes bring the ideas to life. A palette featuring a sheer nude base, glossy black polish, pumpkin orange, white, red, and a matte top coat covers most looks.
Seventeen distinct designs accommodate Halloween parties, school events, work days, or cozy movie nights at home. Friendly ghosts, pumpkin accents, and candy corn tips suit nail art newcomers, while spiderweb corners, bats, drips, and tiny faces wait for confident hands. Each idea works on a single accent nail or across both hands, and proper drying time between layers ensures clean results.
17 Easy DIY Halloween Nail Designs Anyone Can Recreate at Home (Even Beginners Can Nail #5!)

1. Tiny Pumpkin Accent Nails

You can make your manicure feel Halloween-ready with one tiny pumpkin per hand. This design suits short nails because the shape needs only a small orange oval, a few curved lines, and a little stem. It looks festive without taking over your whole outfit. Editor’s Choice
Start with a cream, beige, or muted orange base. Leave the thumb or ring finger clear for the accent art. Use a dotting tool, bobby pin, or toothpick to place a small orange oval near the center of the nail. Add another dot beside it if you want a wider pumpkin, then smooth the edges with a fine brush.
Once the orange dries, add two or three loose black, brown, or rust-colored curves. Finish with a tiny green or brown stem. On longer nails, add triangle eyes and a small smile for a jack-o-lantern effect.
Helpful tips:
– Keep the pumpkin smaller than you expect because top coat slightly softens details.
– Use a pale background so the orange stays bright.
– Wipe excess polish from your tool before making the shape.
– Let uneven lines stay; they give the pumpkin a sweet handmade look.
Pair the accent with plain orange nails, tiny dots, or simple French tips. A glossy top coat pulls everything together, making this easy design perfect for school, work, fall parties, or a cozy movie night.Tiny Pumpkin Accent Nails


2. Friendly Ghost Nail Art

Friendly ghosts give you a cute Halloween manicure without demanding perfect painting skills. Each ghost needs only a soft white body, two dark eyes, and a tiny mouth. Slightly different faces make the set feel lively instead of messy. Editor’s Choice
Choose a dark base such as charcoal, navy, black, or deep purple to make the ghosts stand out. For a softer look, use pale gray or sheer nude. Paint each ghost as a rounded white shape near the tip or center of the nail, then pull two small points downward for a floating sheet effect.
Let the white polish dry before adding the face. A dotting tool creates easy eyes, while a toothpick makes a tiny oval mouth. Give one ghost a wink, a tilted face, or two pink cheek dots for extra personality. On short nails, use one ghost on the thumb or ring finger.
For cleaner results:
– Apply two thin coats of white instead of one thick layer.
– Leave enough space around the face so the features stay clear.
– Add small white dots or stars to the plain nails.
– Float the top-coat brush over the art to prevent smearing.
This design works for beginners, children, and anyone who wants playful rather than scary Halloween nails. Swap black polish for navy details, or add one silver moon for a simple nighttime theme.Friendly Ghost Nail Art


3. Simple Spiderweb Corners
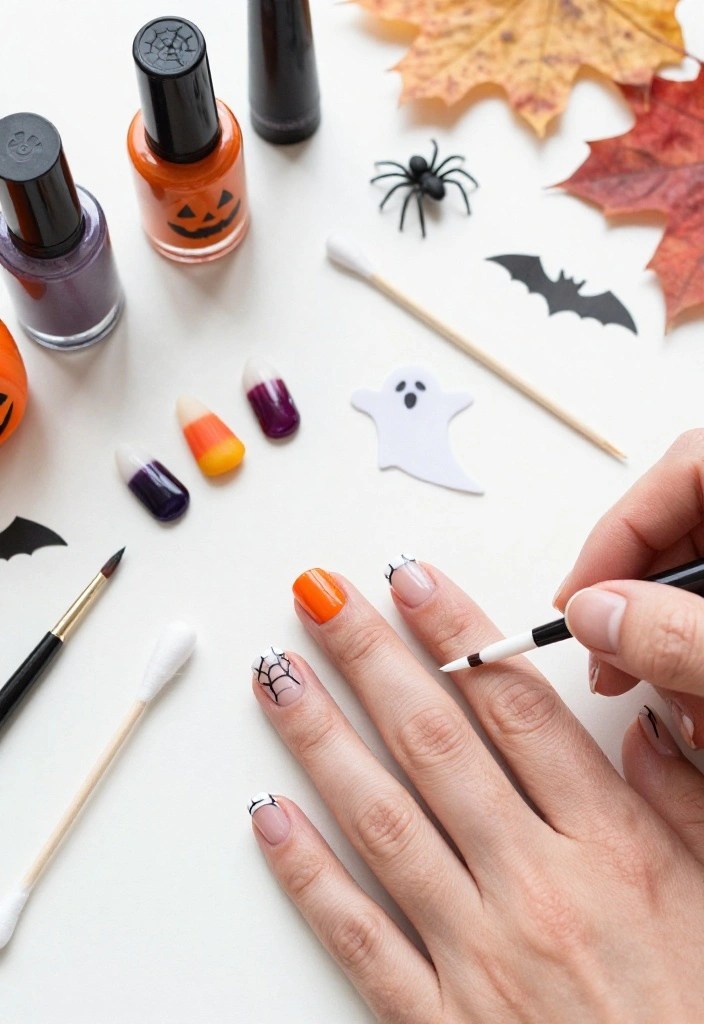
A spiderweb corner gives your nails a spooky detail while leaving plenty of clean, open space. You only need three or four lines meeting at one corner, plus a few curved bridges. That smaller layout feels modern and stays much easier to control than a full nail web.
Use a nude base with black lines for an everyday look, or try black with white, silver, or orange webs for stronger contrast. After the base dries, draw thin lines from one corner toward the center and outer edge. They can be slightly uneven because handmade webs look more natural than rigid ones.
Connect the lines with short curves, starting close to the corner and working outward. Rest your pinky on the table if your hand shakes. Rotate your finger instead of moving your whole wrist for smoother strokes.
Easy web variations:
– Use one white web on a black accent nail.
– Place a tiny orange dot at the center.
– Add one small spider made from a black dot and four short legs.
– Paint only three radiating lines for a minimalist effect.
Keep the web on one or two nails, then use plain black, orange, or sheer nude on the rest. A smooth top coat protects the fine lines from catching on clothes. This design works well for office outfits, casual fall clothes, or a subtle costume manicure.
4. Playful Black Cat Faces

A tiny black cat adds Halloween charm without requiring a detailed drawing. The basic face uses a rounded head, two pointed ears, and bright little eyes. Place it on one accent nail, and the rest of the manicure can stay simple and wearable.
Begin with a light base such as cream, blush, warm nude, or pale orange. Once it dries, make one black dot for the head using a dotting tool. Add two smaller points at the top for ears, or pull the wet polish upward with a fine brush to form one connected silhouette.
After the cat dries, add yellow, green, or white eyes. Tiny whiskers and a triangle nose are optional, especially on short nails. A slightly tilted face can look more charming than a perfectly centered one. For a different mood, use dark brown instead of black.
Make the design easier:
– Put the largest cat on the thumb or ring finger.
– Keep the eyes bright and close together.
– Add a tiny orange moon beside the silhouette.
– Try matte black for the cat with glossy eyes on top.
Complete the set with solid black nails, orange dots, or one shimmer nail. This manicure suits Halloween parties, autumn dinners, and everyday outfits. A glossy top coat keeps the small features smooth, while a matte finish gives the cat a soft nighttime feel.
5. Beginner Candy Corn Tips
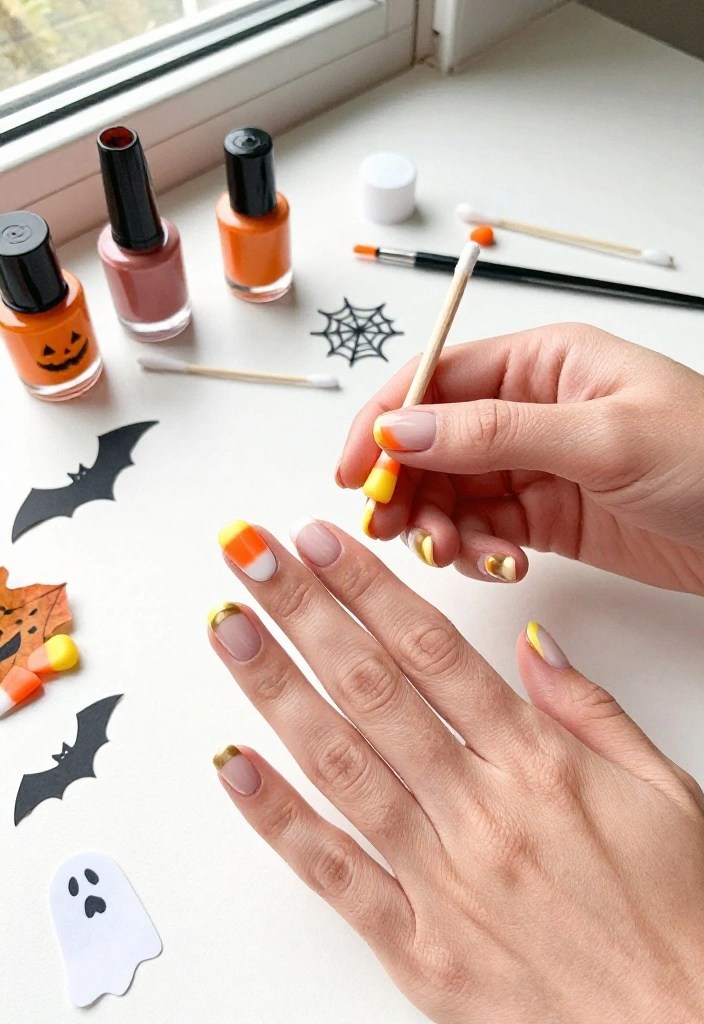
Candy corn tips are ideal when you want Halloween nails but have little nail-art experience. The design depends on simple color bands, so small slips disappear into the pattern. You can use three shades or simplify the look with only cream and orange.
Apply a sheer nude, pale pink, or cream base first. At the nail tip, paint a white or cream section. Add orange beneath it, then finish with yellow or pale gold near the middle of the nail. Keep the stripes horizontal instead of trying to create a perfect triangle. Rounded edges look soft and candy-like.
Short nails may not have room for three clear bands. In that case, paint an orange tip with a cream stripe, or cover the nail in orange and add a cream tip with one tiny yellow dot near the cuticle.
Beginner fixes:
– Widen the next stripe when one band looks uneven.
– Use a small cleanup brush and remover around the sidewalls.
– Wait for each color to dry before adding another.
– Use tape as a guide for straighter tips.
Mix candy corn nails with solid orange, black, or cream fingers. You can also replace yellow with lavender or pink for a softer twist. A glossy top coat blends the layers and makes this design perfect for beginners, school events, fall photos, or Halloween parties.
6. Easy Red Drip Nails

Red drip nails create a spooky statement with a few rounded shapes and almost no drawing. The uneven edges are part of the look, so you do not need a steady hand. Choose cream, nude, or black underneath for a dramatic contrast.
Paint two thin layers of your background color and let them dry. Along the nail tip, place three to five red dots in different sizes. Pull each dot downward with a fine brush, making one or two drips longer than the others. Connect the dots with a thin red line across the free edge.
Deep cherry polish looks rich and moody, while bright red feels more playful. Berry, plum, and burnt orange offer softer alternatives. Keep the polish controlled because a large drop can spread quickly and lose its shape.
Ways to keep drips neat:
– Use a nearly dry brush for the connecting line.
– Make the longest drip slightly off-center.
– Clean the cuticle area with a small brush and remover.
– Wait until the red dries before applying top coat.
Use the drips on one accent nail or turn them into a spooky French tip. Plain black or nude nails balance the stronger design. If one drip spreads, add a nearby dot and make it look intentional. A glossy top coat gives the finished manicure a wet, glassy shine that works for parties and costume nights.
7. Floating Bat Silhouettes
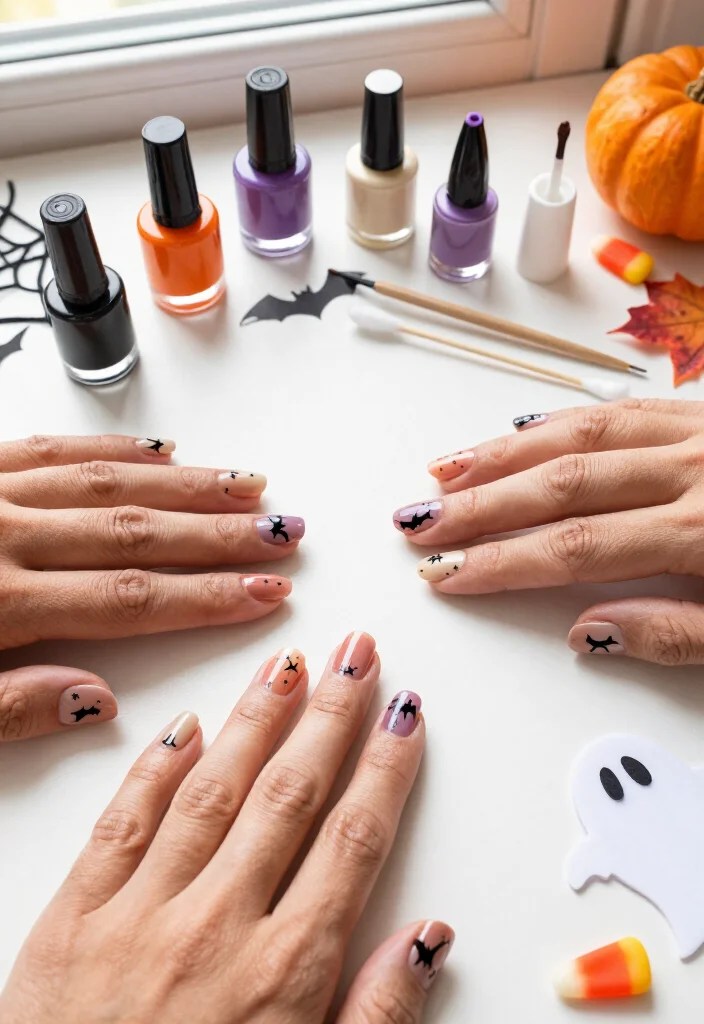
Bat silhouettes look detailed from a distance, but they are built from simple shapes. Start with one black oval body and add two small pointed wings. One bat feels clean and stylish, while several create the look of a night sky. Editor’s Choice
Use cream, dusty pink, gray, pale orange, or sheer nude as the background. Place a small black dot in the center of the nail. With a fine brush, pull each side outward into a short zigzag wing with one or two points. The wings do not need to match perfectly because an uneven bat can look like it is flying.
If brush work feels difficult, make the bat with three connected dots. Use a larger dot for the body and two smaller dots for the wings, then sharpen the outer edges with a toothpick. Add tiny stars, an orange moon, or purple dots around the silhouette.
Simple layout ideas:
– Place one larger bat on the thumb.
– Use tiny bats on one or two accent nails.
– Paint glossy black bats over a matte black base.
– Leave plenty of empty space around every silhouette.
Keep the rest of the manicure plain so the bats remain visible. This design suits short nails, Halloween dinners, and everyday fall outfits. A glossy top coat creates contrast over matte polish, while an all-matte finish gives the set a soft, modern mood.Floating Bat Silhouettes

6 PCS Nail Art Brushes, Nail Design Painting Brush Set with Nail Polish …
 AmazonUSD 5.39

6 Colors Water Based Nail Polish Set – Quick Dry No UV Lamp Needed, Long…
AmazonCheck Price
8. Tiny Frankenstein Faces
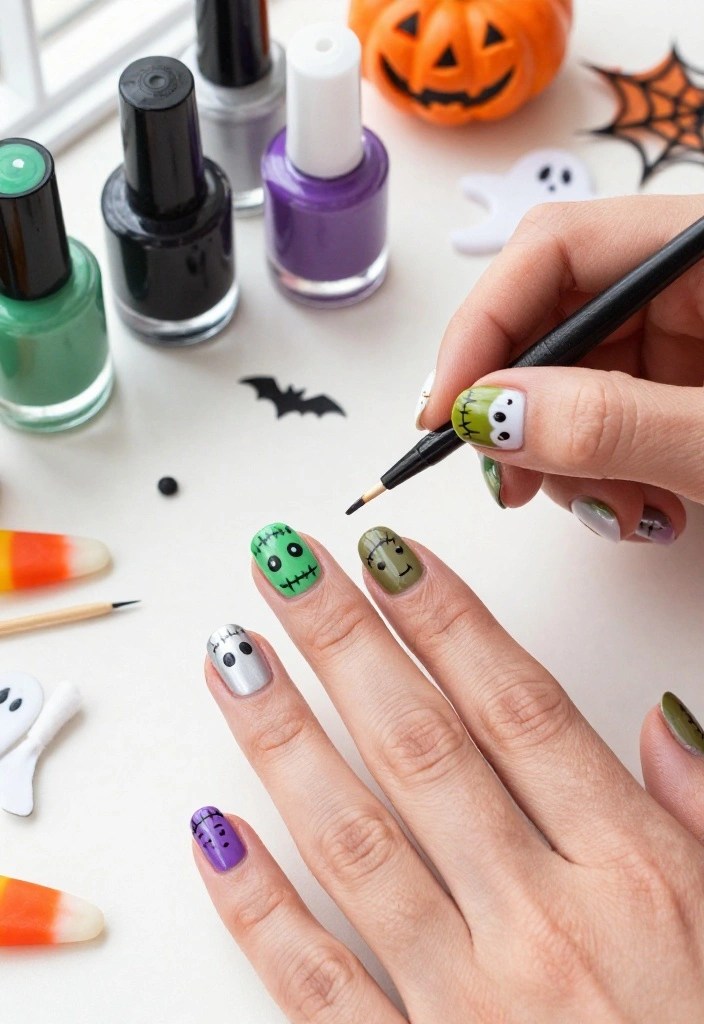
A tiny Frankenstein face brings bold Halloween color to your nails without demanding perfect details. Green polish, jagged black hair, bright eyes, and a few stitches create the character. One accent nail is enough to make the whole manicure feel festive.
Paint the accent nail with two thin coats of soft green, olive, or muted lime. After it dries, use black polish to create a zigzag hairline across the top. A fine brush works well, but a toothpick can pull short points through the wet polish.
Add two white or pale gray eyes, then place smaller black dots inside them. Finish with a short mouth and two or three vertical stitches. Skip metal bolts if your nails are short, or use tiny silver dots near the sides for extra detail.
Color combinations to try:
– Green, black, and white for a classic monster look.
– Olive, rust, and cream for a muted fall palette.
– Lavender, charcoal, and silver for a softer version.
– Lime and purple for a bright party manicure.
Use solid green, black, or purple on the remaining nails. If the face looks uneven, give it a crooked smile or lopsided eyes. Apply base coat first because green polish can stain. Choose glossy top coat for a cartoon finish or matte top coat for a vintage effect.
9. Mummy Wrap Accent Nails

Mummy nails are perfect when your brush control is still developing. Their loose, crossed lines look better with small changes in width and direction. A pale base, dark bands, and two eyes create a spooky character with very little effort. Editor’s Choice
Start with cream, light beige, or soft gray. Apply two thin coats for an even surface. Once dry, use black, charcoal, or brown polish to draw diagonal lines across one accent nail. Leave narrow gaps, let some lines overlap, and avoid making a perfect grid.
For a mummy face, leave a small open area in the center and add two black eyes. White eyes with dark pupils look cute, while tiny red dots create a creepier mood. On very short nails, paint only three diagonal lines and skip the face.
Keep the wraps tidy:
– Use a small amount of polish on your brush.
– Change the angle slightly with each line.
– Let the first set dry before adding crossing strokes.
– Cover overly thick areas with a cream line after drying.
Pair the accent nail with solid gray, black, or purple fingers. A little silver shimmer under the base can add depth, though flat cream is easier for beginners. Finish with a gentle top coat to smooth the raised lines. This forgiving design works for movie nights, costume events, and cozy fall weekends.Mummy Wrap Accent Nails


10. Cute Eyeball Dots
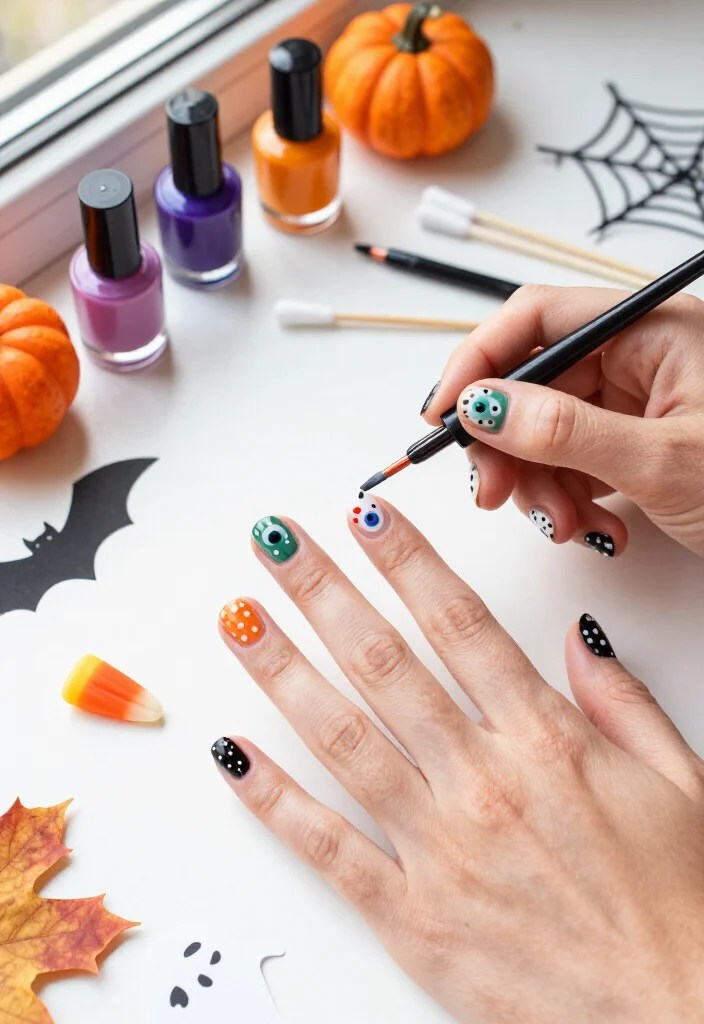
Eyeball nails become easy when you treat each eye as three circles. A white base, colorful iris, and black pupil create the entire design. The eyes can look in different directions, which makes uneven placement feel funny and intentional.
Choose black, purple, orange, or deep green for a bold background. Cream and pale pink create a softer cartoon effect. After the base dries, use a large dotting tool or bobby pin to place white circles on one or two nails. Let them set before adding smaller colored dots for the irises.
Finish with tiny black pupils. Point them upward, sideways, or toward each other for different expressions. Add thin red veins only when you want a more eerie look. On short nails, use two small eyes instead of one large circle.
Easy ways to control the dots:
– Wipe excess polish from the tool before touching the nail.
– Reload the tool for each circle.
– Use different tool sizes for the white and colored layers.
– Let each color dry enough to prevent blending.
Surround one eyeball accent with plain black, orange, or white nails. A glossy top coat makes the circles look glassy, but apply it gently so the pupils do not streak. This flexible design matches almost any Halloween color palette and works well for beginners, parties, or playful fall photos.
11. Matte Black Nails with Tiny Moons
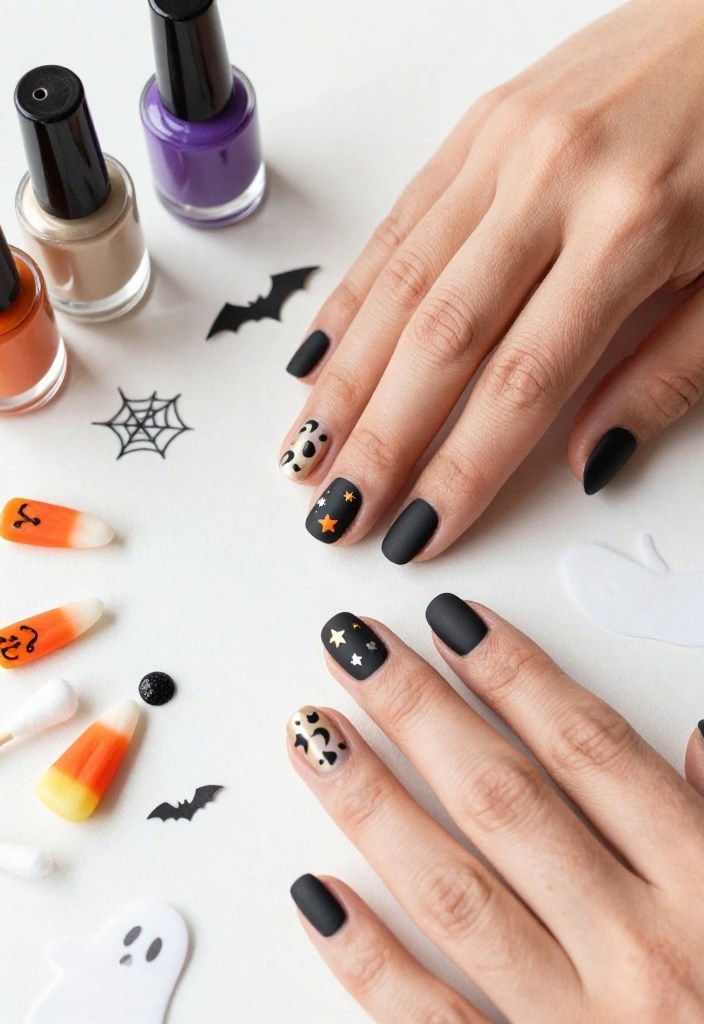
Matte black nails with tiny moons offer a quiet Halloween look that still feels special. The flat finish creates a soft night-sky background, while one metallic or glossy crescent adds a small flash of light. This style works for school, work, dinner, and casual fall outfits. Editor’s Choice
Apply base coat, then two thin layers of black polish. Once dry, add matte top coat. Use silver, cream, pale yellow, or gold for the moons. A fine brush can draw a curved C shape, but a small dot with one side lifted away using a toothpick is easier for beginners.
Place one moon near the cuticle, at the center, or on the thumb. Add a few tiny stars as dots or short crosses, leaving plenty of black space. For a mixed-texture look, use glossy polish only on the moon while keeping the background matte.
For a neat finish:
– Let the matte coat dry completely before adding art.
– Use metallic polish sparingly for a softer result.
– Clean the skin before the matte layer sets.
– Try smoky charcoal, navy, or deep brown instead of black.
Silver creates a cool night mood, while orange or gold feels warmer and more autumnal. Wipe away fingerprints before finishing because matte polish shows oil easily. The result is simple, moody, and polished without requiring character faces or complicated lines.Matte Black Nails with Tiny Moons



12. Orange and Black Checkerboard
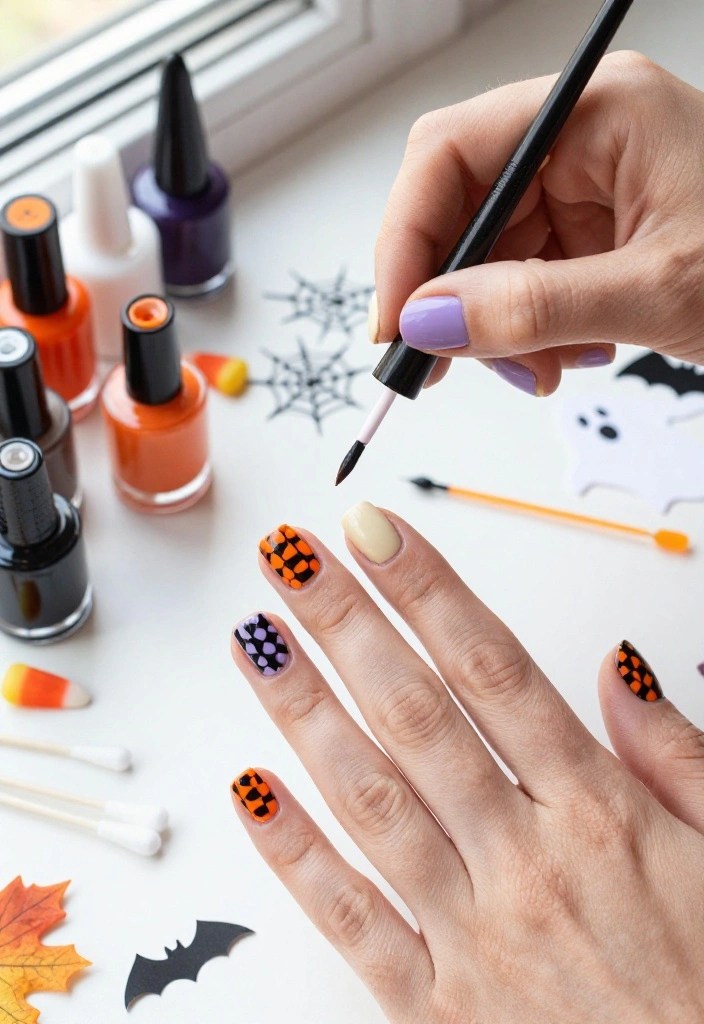
A checkerboard manicure adds bold Halloween energy, but you do not need a perfect grid. A few alternating squares on the tip or one accent nail can suggest the pattern beautifully. This makes the design much more manageable for beginners and short nails.
Start with cream, nude, or orange as the base. Once dry, use a fine brush to paint black squares in alternating spaces. Work with two columns and two rows instead of covering the entire nail. Leave a tiny gap between blocks for a softer, hand-painted finish.
For easier tips, paint the nail orange first and add black squares along the free edge. Striping tape can create a guide, but remove it while the polish remains slightly wet. Irregular blocks also work because strong color contrast makes the pattern easy to read.
Helpful checkerboard tricks:
– Use a small flat brush for cleaner corners.
– Let the base dry fully before adding squares.
– Keep the pattern to one or two accent nails.
– Try black and cream for a quieter look.
If a square slips outside its space, cover the edge with the background color after it dries. Keep the other nails solid black, orange, or cream so the pattern stays clear. A glossy top coat makes the colors bright, while matte polish with glossy squares creates a stylish texture contrast.
13. Autumn Leaf and Halloween Mix

Warm autumn leaves give you a Halloween manicure that feels seasonal without looking overly spooky. Rust, mustard, burgundy, and burnt orange look beautiful against a creamy base. Add one tiny pumpkin or bat, and the set carries a clear Halloween note while staying wearable into November. Editor’s Choice
Choose cream, sheer nude, taupe, or pale beige as your background. Paint a short curved stem, then add three pointed strokes for a simple leaf. You can also place a rust-colored dot and pull it outward with a toothpick. Detailed veins are optional because color and shape already make the leaf recognizable.
Use two or three leaf shades across the manicure. Place one leaf near the cuticle, create a small cluster on the thumb, or scatter tiny dots across the plain nails. A black bat or orange pumpkin on one accent nail adds a playful seasonal touch.
Color ideas:
– Cream, burnt orange, mustard, and chocolate brown.
– Nude, burgundy, forest green, and black.
– Lavender, rust, pale gold, and charcoal.
– Terracotta, beige, and glossy black.
Use thin strokes because they dry quickly and are easier to control. If a leaf grows too large, add two more points and turn it into a cluster. Choose glossy top coat for a rich finish or matte top coat for a soft sweater-weather effect. This design suits office days, fall gatherings, and Halloween events.Autumn Leaf and Halloween Mix

Makartt No Wipe Base and Top Coat Kit 2pcs 10ml Soak Off Nail Gel Base T…
AmazonUSD 8.77
3 Pcs Nail Art Brushes Tools Kit, Reusable Fine Nail Art Tools With Pink…
AmazonUSD 3.50
5PCS Nail Dotting Tools Set, Double Ended Dotting Painting Pen, Embossin…
AmazonUSD 4.44
14. Negative-Space Halloween French Tips

Negative-space French tips keep part of your natural nail visible, giving Halloween art a clean and light appearance. A narrow orange, black, or purple tip adds color without covering the whole nail. The open space also helps short nails look less crowded. Editor’s Choice
Begin with clear polish or sheer nude. Paint the tip with a fine brush or hold the regular polish brush at a slight angle. Try a curved line, diagonal edge, side tip, or tiny scallop. The shape does not need to match perfectly across every nail because small changes make the set feel handmade.
Add one small ghost, pumpkin, bat, star, or leaf near the colored edge. For the easiest detail, place two black dots and a short curve to create a ghost face. You can also scatter a few orange dots like confetti.
Ways to make French tips easier:
– Use tip stickers or tape as a guide.
– Paint each tip in two short strokes.
– Rest your hand on a table for better control.
– Clean the edges with a small brush dipped in remover.
If a tip looks uneven, add a second line beneath it and create a double French tip. Small stars or dots can cover minor slips. Finish with glossy top coat for a neat surface. This versatile style works with everyday clothing, school outfits, work settings, and subtle Halloween costumes.Negative-Space Halloween French Tips

URAQT Nail Art Brushes Set, 15pcs Acrylic Nail Brush Painting Pen and 5p…
AmazonUSD 5.39
Halloween Nail Polish Set – Halloween Nail Varnish Quick Dry – Colorful …
AmazonUSD 10.79
600 Pcs Precision Microblading Cotton Swabs 2.76 Inch Pointed Cotton Swa…
AmazonUSD 8.50
15. Halloween Confetti Polka Dots

Halloween confetti nails are quick, colorful, and forgiving. Dots do not need straight edges or matching sizes, so this design gives beginners a cheerful result with very little pressure. Use orange, black, white, purple, yellow, and green against a simple base. Editor’s Choice
Choose cream, black, orange, lavender, or nude for the background. After it dries, place dots with a dotting tool, bobby pin, toothpick, or rounded hairpin. Start with larger circles, then fill open spaces with smaller ones. Leave small gaps so the colors stay separate instead of forming one crowded patch.
For an organized look, line the dots along one side of each nail or circle the cuticle area. For a party effect, scatter them randomly. Mix plain dots with tiny stars, ghost heads, or one green dot that hints at a pumpkin stem.
Dotting tips that save time:
– Reload your tool for every full dot.
– Use different tool sizes for varied circles.
– Let one color dry before placing another nearby.
– Wipe the tool between shades with remover.
A black base with orange and purple feels bold, while cream with rust and mustard looks softer. Keep one accent nail detailed and use only one dot on the others for a subtle version. Wait for thick dots to dry before applying top coat. This easy design works for parties, fall photos, and first attempts at nail art.Halloween Confetti Polka Dots

Flower Dotting Tool for Nails,5 Petal Flower Nail Art Tool with Stainles…
AmazonUSD 4.04
AIMEILI Gel Nail Polish No Wipe Gel Top and Base Coat Set – Shine Finish…
AmazonUSD 8.09
Halloween Nail Polish Set – Halloween Nail Varnish Quick Dry – Colorful …
AmazonUSD 10.79
16. Mini Tombstone Accent Nails

Mini tombstones create a moody cemetery look with one simple shape. You need a gray or black rounded form, then perhaps a tiny crack, cross, or moon. The design feels dark and stylish without using bright colors or detailed cartoon faces. Editor’s Choice
Choose misty blue, pale gray, nude, or muted purple for the base. With a fine brush, paint a small tombstone near the center or tip of one accent nail. Round the upper corners by pulling the brush inward. If your nails are short, make the shape wider and shorter so it fits naturally.
After the stone dries, add a tiny black cross, two dots, or a short crack. Avoid tiny words because lettering can quickly make the nail look crowded. A small orange moon behind the stone or a few grass strokes along the bottom adds atmosphere with little extra work.
Easy cemetery details:
– Add two black dots for a simple spooky face.
– Use a toothpick for three short grass lines.
– Place one large tombstone on the thumb.
– Add a silver highlight along one side of the stone.
Keep the remaining nails matte black, charcoal, gray, or purple. A glossy tombstone over a matte base creates a subtle texture change. Clean the side edges before top coat, and do not worry if the rounded top is slightly uneven. This design suits darker Halloween outfits, movie nights, and fall gatherings.Mini Tombstone Accent Nails

JODSONE 10ml Nail Polish Sets | 6 Colors Classic Black White Red Pink Co…
AmazonUSD 10.79
5PCS Nail Dotting Pen Marbleizing Dotting Painting Pen Polish Carving To…
AmazonUSD 4.04
Makartt No Wipe Base and Top Coat Kit 2pcs 10ml Soak Off Nail Gel Base T…
AmazonUSD 8.77
17. Mix-and-Match Halloween Party Nails

A mix-and-match manicure lets you enjoy several Halloween ideas without making every nail complicated. Use a pumpkin on the thumb, ghost on the index finger, candy corn on the middle nail, bat on the ring finger, and web on the pinky. Repeating the same colors keeps the different designs connected.
Plan your palette before painting. Orange, black, white, and cream create a classic set, while purple, green, red, or gold add more personality. Paint background colors first, then complete easy dots and stripes before attempting small faces or thin lines. Save the largest details for your thumb or ring finger.
A helpful order is dots first, candy corn second, ghosts and pumpkins next, then webs and bats last. Keep two nails mostly plain so the detailed accents have room to stand out. Solid orange, glossy black, or sheer nude makes a useful visual break.
Simple planning rules:
– Repeat one shade on at least three nails.
– Use no more than five main polish colors.
– Keep detailed art to two or three nails per hand.
– Apply the same top coat across the whole set.
– Pause if your hand feels tired or tense.
If one design fails, replace it with dots or a solid color instead of restarting. A smudge can become a star, pumpkin, or second dot with a small adjustment. Finish after everything dries. This playful set suits Halloween parties, movie nights, fall photos, and anyone who wants variety without leaving home.
Conclusion: Your At-Home Halloween Manicure Starts Small

The best DIY Halloween nails are the ones you can enjoy creating, even when every line is not perfect. Start with dots, candy corn tips, pumpkins, or friendly ghosts, then add spiderwebs and tiny silhouettes as your confidence grows. With a few easy nail art tools and a little drying time between layers, your at-home manicure can feel festive, personal, and completely achievable. Choose one favorite design or mix several into a playful set, then share your finished beginner nail designs with someone who loves Halloween as much as you do.
Note: We aim to provide accurate product links, but some may occasionally expire or become unavailable. If this happens, please search directly on Amazon for the product or a suitable alternative.
This post contains Amazon affiliate links, meaning we may earn a small commission if you purchase through our links, at no extra cost to you.
Amazon and the Amazon logo are trademarks of Amazon.com, Inc, or its affiliates.


Author

judieannrose@live.co.uk
Related posts

16 Hydrating Winter Face Masks For Instant Glow And Comfort (Dry Skin Will Love #8!)
- 0
- 4,417 words
Cute DIY Halloween nails require only polish, a toothpick, a bobby pin, and a little patience.
Read out all
20 Gothic Accessories That Instantly Transform Any Outfit Into A Dark-Fashion Dream
- 0
- 5,587 words
Cute DIY Halloween nails require only polish, a toothpick, a bobby pin, and a little patience.
Read out all
20 Black Nail Designs So Gorgeous, You’ll Want To Copy Every Single One (Wait Until You See #17!)
- 0
- 5,695 words
Cute DIY Halloween nails require only polish, a toothpick, a bobby pin, and a little patience.
Read out all
20 Stunning Long Hairstyles That Make Every Day A Good Hair Day (The Layers Are Everything!)
- 0
- 5,046 words
Cute DIY Halloween nails require only polish, a toothpick, a bobby pin, and a little patience.
Read out all
19 Halloween Eye Makeup Ideas That’ll Make Your Eyes Impossible To Ignore (The Spider Look Is Everything!)
- 0
- 4,923 words
Cute DIY Halloween nails require only polish, a toothpick, a bobby pin, and a little patience.
Read out all
15 Best Hair Growth Supplements For Thicker-Looking Hair: The Nutrients You Should Know Before You Buy
- 0
- 4,348 words
Cute DIY Halloween nails require only polish, a toothpick, a bobby pin, and a little patience.
Read out all


