
As an Amazon Associate I earn from qualifying purchases.
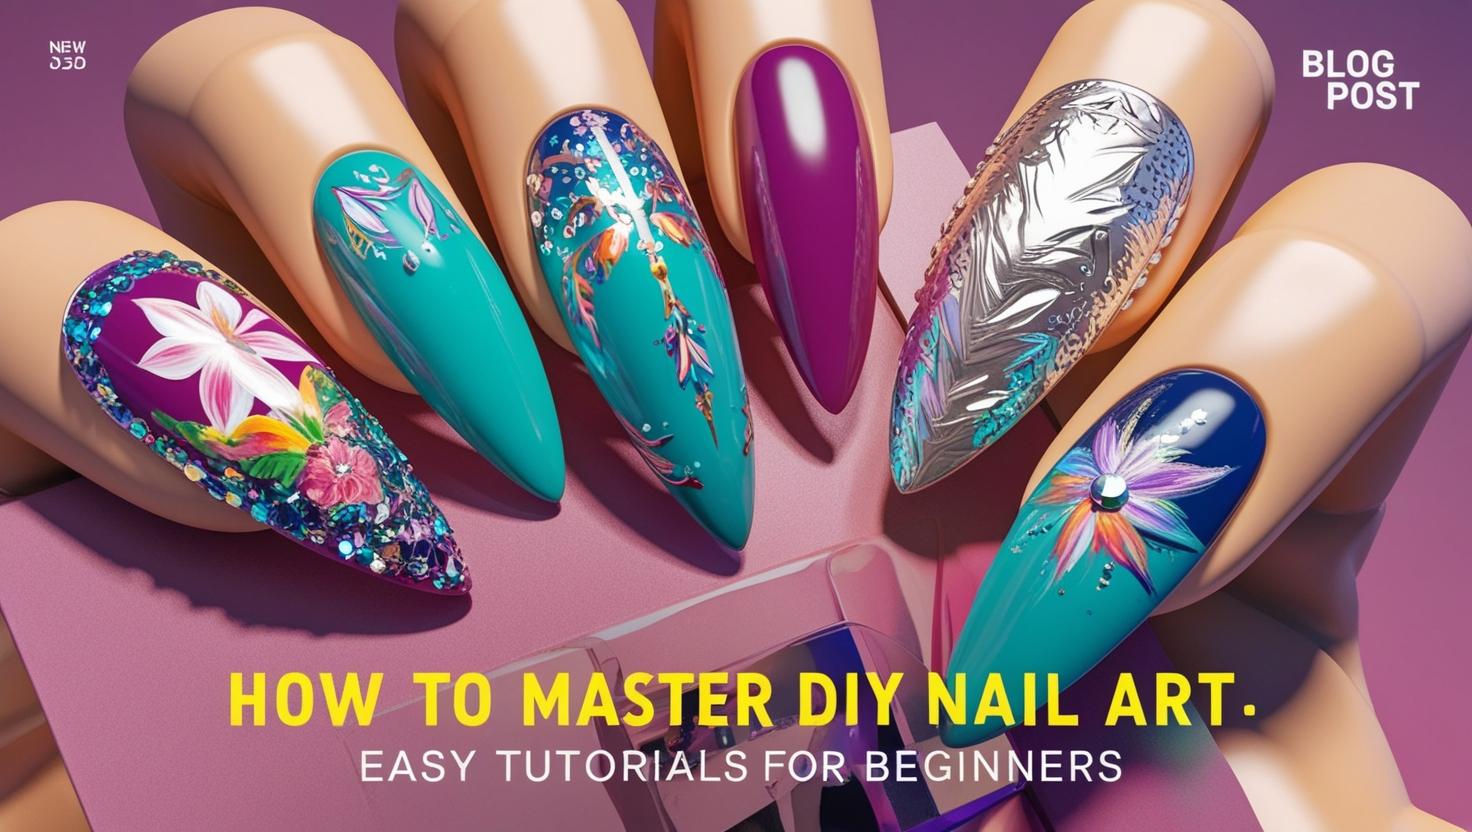
On the JJ Barnes Blog, this easy tutorial for DIY nail art will help you master salon quality nail designs without the price tag.

Unlock your inner nail artist with these fun DIY nail art tutorials that are easy enough for everyone!
Whether you’re prepping for a special occasion or just looking to add some flair to your everyday look, painting your nails at home can be a creative outlet.
With just a few tools and a sprinkle of imagination, you can turn plain nails into stunning masterpieces.
Follow along as we share some of the simplest yet chic designs that will elevate your nail game without the need for salon visits. Let’s get started on this colorful adventure!
1. Ombré Nails: A Smooth Transition

Ombré nails are all the rage, and for good reason! This technique blends two or more colors for a gorgeous gradient effect that looks oh-so-professional.
To achieve this look, start with a base coat of your chosen color. After it dries, use a makeup sponge, like the makeup sponges for nail art, to dab on the second color, fading it from the tip of your nails towards the base. These sponges are perfect for creating that soft transition you want in your ombré design. For a stunning ombré, go with contrasting shades, like pink and purple or blue and green.
Here are some tips to perfect your ombré nails:
– Use a quick-drying top coat, such as Seche Vite professional top coat, to seal the look and give it that glossy finish. This top coat not only speeds up drying time but also enhances the overall appearance of your nails.
– Experiment with different colors; pastels work beautifully for spring, while darker shades are perfect for fall. If you’re looking for a range of colors, consider the nail polish set (ombre colors), which features 48 different modern colors that are quick-drying and ideal for creating stunning ombré effects.
– Practice makes perfect! Don’t be discouraged if your first attempt isn’t flawless.
With a little patience and creativity, your ombré nails will definitely turn heads!
Product Recommendations:
• makeup sponges for nail art
• Seche Vite professional top coat
• nail polish set (ombre colors)
2. Geometric Patterns: Edgy and Fun

Get your inner artist flowing with geometric nail art! This design is all about lines, shapes, and bold colors.
Start with a base color of your choice, then use nail striping tape to create sections on your nails. This tape will help you achieve clean, precise lines, making it easier to fill in the sections with contrasting colors for a striking look—think triangles, squares, or even stripes!
Here are some ways to elevate your geometric nail art:
– Choose a color palette that harmonizes or contrasts effectively; light pastels paired with bold colors can be really eye-catching.
– Try using a detail nail art brush set for fine lines—precision is key! These brushes and dotting tools will give you the control you need to create intricate designs.
– Don’t forget to seal your masterpiece with quick-dry top coat to keep it looking fresh. A good top coat not only adds shine but also protects your artwork from chipping.
The beauty of geometric designs is their versatility; whether you go for bold and bright or subtle and chic, there’s a style for every mood.
Product Recommendations:
• nail striping tape
• detail nail art brush set
• quick-dry top coat
3. Floral Accents: Nature at Your Fingertips

Nothing says ‘feminine’ quite like floral designs! They’re perfect for the romantic in you and can easily be done at home.
Start with a base coat in soft pastel shades. Once it’s dry, use a fine brush or dotting tool to create small flowers and leaves in your favorite colors. A classic white flower with a yellow center looks lovely against a light blue background!
Here are some tips for nailing those floral accents:
– Practice your flowers on a piece of paper first to get the shapes just right. A nail art brush set can help you create those perfect delicate shapes.
– Experiment with different flower types; daisies, roses, or even abstract flowers can add unique charm. For intricate details, consider using dotting tools for nail art to enhance your designs.
– Consider using a topcoat that has a slight shimmer to enhance your floral creations. The Rimmel London holographic nail polish top coat adds a beautiful finish that will make your nail art pop.
With floral nail art, your nails can be as expressive as a garden in full bloom!
Product Recommendations:
• nail art brush set
• dotting tools for nail art
• Rimmel London holographic nail polish top coat
4. Stripes and Dots: Simple Yet Chic

If you’re looking for something quick yet stylish, stripes and dots are your go-to! This design is super easy and can be dressed up or down depending on your color choices.
Start with a solid base color and consider using a top coat nail polish like Barry M Nail Paint to ensure a smooth foundation for your design. Then, grab a dotting tool or a thin brush, such as those in the dotting tool set or the nail art brush set, to add stripes or dots in a contrasting color. You can create horizontal, vertical, or even diagonal stripes for added interest.
A few tips for this design:
– Mix and match colors! Try alternating pastel shades for a playful summer look or stick with monochrome for a classy vibe.
– Use a topcoat to give your nails a polished finish and prolong the life of your design.
– Remember, perfection is overrated! The charm of this design lies in its simplicity and spontaneity.
You’ll be amazed at how chic your nails can look with just a few simple details!
Product Recommendations:
• Barry M Nail Paint
• dotting tool set
• nail art brush set
5. Marble Effect: Classy and Elegant
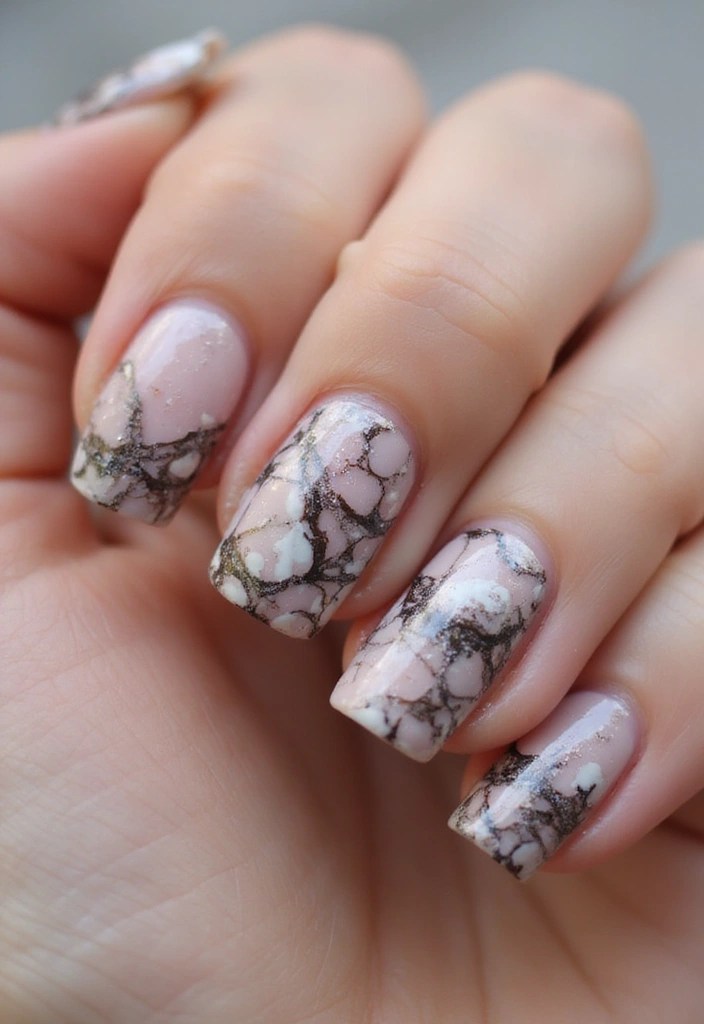
Marble nails are the epitome of elegance with their sophisticated swirls and patterns. Achieving this look at home is easier than you might think!
Start with a white base coat and then drop a few dots of your chosen colors on top. Using a toothpick or a small brush from a nail art brush set, swirl the colors together to create that coveted marble effect. Don’t worry about making it perfect; the beauty of marble is in its imperfection.
Here are some tips for that flawless marble finish:
– Choose colors that complement each other—think soft pastels or classic black and white. A great option for soft colors is the nail polish set (pastels and neutrals), which includes a lovely range of shades perfect for this look.
– Use a topcoat to seal the design and add shine. The top coat nail polish not only enhances the shine but also helps your marble design last longer.
– Experiment with different colors and swirling techniques to find what looks best for you.
Marble nails can add a touch of high-class elegance to any outfit, making them perfect for special occasions or just when you want to feel fancy!
Product Recommendations:
• nail art brush set
• nail polish set (pastels and neutrals)
• top coat nail polish
6. Glitter Gone Wild: Sparkle and Shine

If you love a little bling, glitter nails are the way to go! Glitter can transform any basic nail design into a dazzling work of art. You can choose to have glitter as an accent nail or go all-out with a full glitter manicure. Start with a base coat and let it dry, then apply a layer of glitter polish or dip your nails into loose glitter for that extra sparkle.
For a fabulous full glitter look, consider using the Saviland Glitter Nail Polish Set. This set includes 12 colors of quick-drying nail varnish, perfect for layering and mixing to create your unique glitter style.
For an even more glamorous effect, try layering different colors of glitter. The Loose Glitter for Nail Art is a fantastic addition to your nail art toolkit. This set comes with 12 colors of festival-quality glitter, allowing you to customize your nails with various shades and textures. Plus, it includes a brush for precise application, making it easier to add glitter exactly where you want it.
Here are some helpful tips for glitter nails:
– Apply a topcoat, like Barry M Nail Paint, to help keep the glitter in place and add shine. This product acts as a base coat, top coat, and nail hardener all in one, ensuring that your glittery masterpiece lasts longer.
– Use a makeup sponge to add glitter precisely to specific areas for a gradient effect.
– Don’t be afraid to mix glitter sizes and shapes for extra dimension!
These sparkly creations are perfect for parties, holidays, or just when you want to feel fabulous!
Product Recommendations:
• Saviland Glitter Nail Polish Set
• Loose Glitter for Nail Art
• Barry M Nail Paint
7. Negative Space: The New Trend

Negative space nail art is perfect for those who want a modern and minimalistic design. This technique leaves parts of the nail bare, creating a stunning contrast with colored polish.
Start by painting your nails with a clear or nude base coat. A great option for this is the nude base coat nail polish, which provides a sheer nude finish that looks fantastic as a background for your designs. Once it’s dry, use tape to create designs or shapes, like stripes or triangles. The nail art tape will help you achieve clean lines and precise shapes when you paint over them with your desired colors. When you peel the tape away, the negative space will reveal the natural nail underneath.
Consider these tips for negative space designs:
– Play with shape and angles; geometric designs work beautifully with this technique.
– Use contrasting colors to make the negative space pop.
– Experiment with different placements for an avant-garde look.
To add more detail to your designs, you can use the nail art brush set, which includes various brushes and dotting tools to help create intricate patterns. Negative space nails offer a chic and modern vibe, making them perfect for any occasion!
Product Recommendations:
• nude base coat nail polish
• nail art tape
• nail art brush set
8. Tie-Dye Effect: A Bold Statement

Bring back the retro vibes with tie-dye nails! This fun and colorful design is a throwback that’s making a major comeback.
Start with a white base coat and then use a few different colors to create the tie-dye effect. A great way to achieve this is with a small brush like the Nail Art Brush Set, which includes 15 different brushes to help you swirl the colors together. Alternatively, you can use a sponge for a softer finish; the Sponge Nail Art Tool is perfect for this technique and comes with replacement heads for long-lasting use. The key is to go wild and let your creativity flow!
A few tips for tie-dye nails:
– Don’t be afraid to mix colors that you love; vibrant combinations can create a playful look.
– Apply a quick-drying topcoat like Quick-Drying Top Coat to prevent smudging and help your design last longer.
– Practice different swirling techniques to find your favorite method!
Tie-dye nails are perfect for festivals, summer outings, or when you simply want to show off your fun side.
Product Recommendations:
• Nail Art Brush Set
• Sponge Nail Art Tool
• Quick-Drying Top Coat
9. French Tips with a Twist: Classic Meets Modern

The French manicure is a timeless classic, but why not give it a modern twist? This design allows you to maintain the elegance of the French tips while adding a splash of creativity.
Start with a nude base and then choose a bold color for the tips. A great choice for this is the Nail Polish Set (Bold Colors), which features an array of vibrant shades that can really make your tips pop. You can also play around with different shapes for the tips—think diagonal cuts or even zig-zags!
Here are some tips for a fresh take on French tips:
– Combine unexpected colors for a fun twist; try neon colors or pastels!
– Add embellishments like gemstones using Nail Art Gems and Embellishments. These flat back crystal rhinestones come with a handy tweezer for easy application and can add that extra flair to your design.
– Play with textures; matte polish can look stunning alongside glossy tips. If you’re serious about your nail art, consider investing in a Nail Art Brush Set. This set includes various brushes and dotting tools that will help you create intricate designs, ensuring your modern French manicure looks polished and professional.
A modern French manicure can elevate any look, from casual to formal!
Product Recommendations:
• Nail Polish Set (Bold Colors)
• Nail Art Gems and Embellishments
• Nail Art Brush Set
10. Animal Prints: Wild and Fun

Unleash your wild side with animal print nail art! Whether it’s leopard spots or zebra stripes, animal prints add a playful touch to your nails. Start with a solid base color—neutrals work well for animal prints. For this, consider using the nail polish set (neutral and contrasting colors), which offers 48 different shades to help you find the perfect base for your design.
Next, grab a thin brush, like the nail art brush set, which includes a variety of acrylic nail brushes and dotting tools. This will make it easier to create spots or stripes with a contrasting color. For instance, black spots on a beige base create a classic leopard look.
Here are some tips for rocking animal prints:
– Don’t hesitate to mix different prints together; a zebra and leopard combo can be super fun!
– Consider using the glossy top coat to enhance the dramatic effect of your nails.
– Keep your design simple if it’s your first try; less is often more with prints.
Animal print nails can be both fierce and fashionable, making a bold statement wherever you go!
Product Recommendations:
• nail art brush set
11. Watercolor Effect: Soft and Dreamy

Watercolor nails offer a dreamy, ethereal quality that’s simply enchanting. This technique mimics the soft, blended look of watercolor paintings, making it a perfect choice for your next nail art project.
Start with a white or soft pastel base using a high-quality pastel nail polish set. These gentle colors will provide an ideal foundation for your watercolor effect. Then, using a fine brush from the nail art brush set, lightly dab your chosen colors onto the nail, allowing them to mix and blend naturally. With just a few colors, you can achieve a beautiful gradient!
For the perfect watercolor look, consider these tips:
– Use a lighter touch with your brush for a softer effect.
– Experiment with different color combinations for a unique look.
– Finish off with a matte top coat for a lovely finish that complements the dreamy vibe.
Watercolor nails are perfect for spring or summer and can evoke a sense of calm and beauty!
Product Recommendations:
• pastel nail polish set
• nail art brush set
• matte top coat
12. Foil Accents: Luxe and Glamorous

Add a touch of luxury to your nails with foil accents! This trendy technique offers a glamorous finish that’s perfect for special occasions.
Start by applying a base color of your choice, and for optimal results, consider using a Clear Nail Polish like Barry M’s 3 in 1 base coat, top coat, and nail hardener to ensure your base lasts longer. Next, cut small pieces of gold or silver foil. To adhere the foil to your nails, use a high-quality adhesive like the Nail Art Foil Kit, which includes an effective glue to help the foil stick seamlessly. Gently press the foil onto your nails, applying it to the tips or using it as an accent on a few nails for a stunning effect.
Here are some additional tips for working with foil:
– Use a good quality foil for better adherence and shine.
– Try mixing different colors of foil for a more dynamic look.
– Seal everything with the Clear Nail Polish to keep your design intact.
For more precision in application, having a Nail Art Brush Set can be incredibly helpful. With various brushes and dotting tools, it makes it easier to create detailed designs and apply the foil exactly where you want it.
Foil accents will elevate your manicure to a whole new level, making your nails look fabulous and chic!
Product Recommendations:
• Barry M’s 3 in 1 base coat
• top coat
• and nail hardener
• Nail Art Foil Kit
• Nail Art Brush Set
13. Seasonal Themes: Reflecting the Seasons

Nail art can be a beautiful way to celebrate the seasons! From autumn leaves to winter snowflakes, there’s a seasonal design for every time of year.
For fall, consider deep reds, browns, and golden hues with leaf designs. You can easily achieve this by using nail art stickers that feature floral motifs perfect for capturing the essence of the season. In winter, icy blues and whites with snowflakes create a serene look; using nail art stencils can help you achieve those intricate snowflake designs without the need for steady hands. Spring is ideal for pastels and flower patterns, where those same stickers can add a touch of whimsy. Summer brings bright, bold colors and tropical patterns—perfect for experimenting with vibrant shades.
Here are some inspiring tips for seasonal nail art:
– Use nail art stencils if you’re short on time but want a detailed look.
– Consider the overall color palette of the season when selecting your shades.
– Add sparkle with glitter nail polish for that festive touch during holidays!
Seasonal nail art is a fun way to express yourself and stay in tune with the changing times.
Product Recommendations:
• nail art stickers
• nail art stencils
• glitter nail polish
14. Color Block: Bold and Beautiful

Color-blocking is an art form that can be easily translated onto your nails! This technique uses bold colors and geometric shapes to create a striking look.
Start with a base that’s a neutral or pastel tone, and to achieve those sharp lines for the color-blocking effect, consider using nail art tape. Simply use the tape to section off different areas of the nail, then fill in the sections with bold colors that complement or contrast each other.
Here are some tips to nail this design:
– Keep the shapes simple for the best results, especially if you’re a beginner.
– Finish your look with a matte top coat nail polish for a modern finish that really elevates the design.
– Don’t be afraid to experiment with unexpected color combinations! A nail polish set (bold colors) can provide a vibrant palette to choose from, making your nail art both trendy and personal.
Color-blocking not only looks fantastic, but it’s also a wonderful opportunity to showcase your personality and creativity.
Product Recommendations:
• nail art tape
• matte top coat nail polish
• nail polish set (bold colors)
15. Personalized Nail Art: Make It Your Own

Personalized nail art is all about making your manicure uniquely you. Whether it’s initials, favorite symbols, or patterns that resonate with you, custom designs add a special touch.
Start with a base color using a set like the nail polish set, which offers a wide variety of modern colors to choose from. Once you have your base, use fine brushes or nail pens, such as the nail art brush set or the nail art pens, to add your personal touches. You can paint tiny hearts, stars, or even your monogram! These tools make it easier to create intricate designs or simple details that can make a big impact.
Here are some tips for personalized nail art:
– Keep it simple if you’re new to nail art; small details can make a big impact.
– Choose colors that reflect your personality—your nails should be as vibrant as you are!
– Don’t hesitate to combine different styles and techniques for a one-of-a-kind design.
Personalized nail art allows you to showcase who you are, making your nails a true reflection of your style!
Product Recommendations:
• nail polish set
• nail art brush set
• nail art pens
Conclusion

Mastering DIY nail art can be a fun and fulfilling hobby, giving you the chance to express yourself and your creativity.
With these easy nail art tutorials, you can explore a variety of styles and techniques right from the comfort of your home.
So gather your tools, unleash your imagination, and let your nails tell your story!
Note: We aim to provide accurate product links, but some may occasionally expire or become unavailable. If this happens, please search directly on Amazon for the product or a suitable alternative.
This post contains Amazon affiliate links, meaning I may earn a small commission if you purchase through my links, at no extra cost to you.
Amazon and the Amazon logo are trademarks of Amazon.com, Inc, or its affiliates.
Author
judieannrose@live.co.uk
Related posts

Step By Step: How to Create Your Own Natural Skincare Products at Home
Creating your own natural skincare doesn’t just save you money; it also lets you customize your routine to fit your skin’s unique...
Read out all
The Ultimate Guide to Trendy Eyeshadow Looks: Tips for Every Occasion
Whether you're getting ready for a casual brunch with friends, a glamorous night out, or simply want to elevate your everyday makeup...
Read out all
19 Creative Fruit Nails Inspiration That Will Blow Your Mind!
With vibrant patterns and playful designs, fruit-inspired nails can brighten any day and turn ordinary manicures into fun statements.
Read out all
21 Summer Skin Care Tips for a Radiant Glow (Don’t Miss #16!)
As the temperature rises, so does the potential for our skin to feel parched and sun-kissed. This summer, let’s embrace the season...
Read out all
Helping My Daughter Navigate Tween Skincare With Confidence
As a mum of daughters, I’ve always wanted to empower my girls to feel confident in their own skin—literally and figuratively. Now...
Read out all
11 Genius Ways to Clean Your Makeup Brushes Like a Pro (Hack #4 Is a Game Changer!)
From simple household items to innovative techniques, get ready to revolutionize your brush cleaning routine. With each tip, you’ll find practical insights...
Read out all